
 This topic is locked
Included in this guide you will find: (scroll down to find the large bold heading corresponding to what you are looking for)
1-Basic Hotkeys and the ideal way to combine and them to improve yourself
2-Best way to scout out the battlefield
3-Basic Builds for both Allies and Soviets on Red alert 2
4-Advanced tactics only used very rarely
5-Rushes for both factions
6-A list of the QM (QuickMatch) maps you will experience on Red alert 2
7-Extras
1-Basic Hotkeys and the ideal way to combine and them to improve yourself
HOTKEYS
Q - Main Building tab (Flicks the Tab to the First One)
W - Defense tab (Flicks the Tab to the Second One)
E - Infantry tab (Flicks the Tab to the Third One)
R - Units (Tanks, etc) tab (Flicks the Tab to the Fourth One)
T - Select that/those certain units in your view (click it twice selects all of that/those certain units on the map)
S - Stop (Stops what that current unit was pre-ordered to do)
N - Next unit (Goes to next unit on the map)
X - Scatter (Scatters all units selected in an attempt to not be run over)
D - Deploy (Deploys all select unit if they haeva secondary function/units inside)
CTRL + 1-9 - Create Team
1-9 - Select Team
P - Select all units with an "Attack" ability (excludes miners) on the screen (click twice for all units on map)
H - Home (Takes you to your base)
B - Beacon (Places a beacon)
alt + click one of your tanks - to put your tanks in a compact group
Spacebar - Go to last action announced or beacon placed.
CTRL + SHIFT - Attack Move
WAYS TO USE HOTKEYS:
-A faster way to get your MCV deployed at the start of game is to do "N,D", N for "Next Unit" and D for "Deploy"
-A faster way to place building is to push the "Q" or "W" depending on what building you wish to place and click on the battlefield where you want it
-Make Teams of Units (1 team for Rocketeers, 1 for Fodder, etc) to select the group push the number you assigned to it (cntrl + number) adn to flick to the part of the map those units are on, push the "Team Number" twice
-Whenever you wish to view your base, just push "H"
-Whenever you hear "Unit Lost" or "Miner Under Attack" just push Space-Bar and your screen will flick to where that message came from
-Create a Map Bookmark of your opponent's base and push F1-F4 (depends which one you assigned it to) to instantly go to that location
-Use CTRL + SHIFT to move away and have units stop to attack anything in range, good for IFV's
2-Best way to scout out the battlefield
The best way to scout a map is to build a certain number of dogs (which of course differs on map size
Example; 2 Dogs for a small map, 3 for a medium sized map, and 4 for a large map) and uncover as much shroud as possible, but preferably the opponents base so you can observer what they are doing and try to counter them.
Allies also have the option to scout with Rocketeers and Harriers/Black Eagles although you must scout early and with Attack Dogs.
SCOUTING UNDER GAP GENERATORS
If you desperately need to see what is underneath an Allied GAP Generator then there a few things you can do, but generally you must sacrifice a unit (Rocketeer, Amphibious Transport, Flak Trak, IFV, Paradrops or even a Kirov Airship)
This little feat helps Soviet Dreadnaughts to kill buildings and units under Allied GAP.
ANTISCOUTING YOUR BASE
Of course if your opponent can see what you are building then he has the opportunity to counter it right? Well if you manage to kill all the enemies scouting units he may have a harder time countering your Build Orders. (Example; Deploying a few Gi's around your base should kill enemy dogs, or you can leave dogs around your base, or you can even get an early Rocketeer to do the job for you)
3-Basic Builds for both Allies and Soviets on Red alert 2
Build Orders is what the majority of Ra2 is about, how good your build order is (and how you control the units of course) usually defines how good you are as a player.
Here is a very basic Build Order for both sides, on maps with Tech Oil Derricks and Gems you will need less Ore Miners because there are far richer resources on the map.
Allies:
Power Plant
Barracks (Scout the map, attempt to catch any Oil Derricks nearby)
Ore Refinery
War Factory (Build 1 Ore Miner from it, then Grizzly Battle Tanks)
Ore Refinery
Ore Refinery (Sell the Ore Refinery furthest away from the Ore being mined)
Airforce Command Centre (Rocketeers and Harriers/Black Egles to attack your enemy)
Ore Refinery
Power Plant
War Factory (To increase build speed)
Battle Lab (Any teched units you want)
Ore Purifier
Soviet:
Tesla Reactor
Barracks (Scout the map, attempt to catch any Oil Derricks nearby)
Ore Refinery
War Factory (Build 1 Ore Miner from it, then Tanks)
Ore Refinery (sell after placement)
Ore Refinery
Radar
Tesla Reactor
Ore Refinery
War Factory
Battle Lab (Any teched units you want)
Nuclear Reactor
4-Advanced tactics only used very rarely
DESO + APOC PUSH
Obviously this is a tactic invented for Iraq, which consists of a few War Factories and a Battle Lab and Cloning Vats.
In rather lengthy games (more often than not against Allied players) the combination of Mass Apocalypse Tanks and Mass Desolators is VERY strong. The 'push' comes from being aggressive with these units, Driving the Apocs across the map toward the enemy with the Desolators mixed fairly evenly amongst them. No Allied unit can take this army on as Desolators (when deployed) easily eradicate all Allied units, and with the heavily armoured Apoc tanks ready to slaughter everything in sight this tactic is rather brutal.
SPYING THE ENEMY
The Allied Spy is a very underated unit as this unit costing 1000$ has the power to;
1. To reset the opponents Radar if sent into their Radar
2. To allow you to build Veteran Tank units if sent into an enemy War Factory
3. To allow you to build Veteran Infantry units if sent into an enemy Barracks
4. Creates a new infantry unit if sent into an enemy Battle Lab
5. Can shut off enemy power if sent into a Power Plant
The best way to successfully spy an enemy that is aware is to distract him and send in a SPY IFV around the outskirts of the map and into his base while you have him distracted. (You may wish to distract him with many things at once, consisting of Tank Splits while a paradrop is in his base away from the Spy-Target)
DESO-BOMBING
Another Iraq-inspired technique.
This is when you get a Flak Trak and fill it with Desolators and drive it straight into the enemy's units deploying all the Desolators on his tanks. This is lethal towards Mirage and Prism Tanks as they are very weak. This tactic also works well at weakening soviet armies.
THE ART OF FODDER
Fodder are units which are meant to distract the enemy to let you kill his army while his army is set to killing something you don�t need, example: (You have 5 Rhino (Soviet) Tanks and the enemy has 6 Grizzly (Allied) Tanks and you throw in 3 or 4 Attack Dogs in front of your tanks, his tanks will shoot your dogs while your tanks will kill his. Fodder is also a key factor to winning tank battles. A good way to use fodder/unwanted units is to set all those units to �Team 1� and to send them into battle in front of your tanks, that�s how you use fodder. Fodder is not just for land units, Rocketeers can need fodder so the enemy shoots your tanks while your Rocketeers kill all of his.
5-Rushes for both factions
Rushing is obviously a faster way to end a matchup. Although some consider it 'cheap' and 'unskillful' there is some skill in knowing exactly how to rush and when to attack and how to attack, forcing them to make a crucial mistake. Rushing takes guts and a fair amount of skill in controlling the units you have
Rocky Rush: - Allies against Allies
Depending on the resources on the map you can try with 3 barracks or on a rich resource map even 6 barracks, which means rocketeers will build super fast,
Power Plant
Barracks (Anti Scout Well)
Ore Refinery
Airforce Command Centre (Build lots of Rocketeers!)
Barracks
Barracks
Barracks
Sell MCV if you think it is needed
Attack
Sell MCV Rush: - Soviet against Allies
Tesla Reactor
Barracks (Scout the map)
Ore Refinery
War Factory (Rhino Tanks)
Ore Refinery (Sell this when placed)
Ore Refinery (Sell this when placed)
Sell your MCV
At this point build a few Attack Dogs to use as fodder
Attack
Engi Sell MCV Rush: Soviet against any side
Tesla Reactor
Barracks (Scout the map)
Ore Refinery
War Factory (1 Flak Trak, 1 Terror Drone <1 Engineer from Barracks>, 1 War Miner then Tanks)
Ore Refinery
Send The Flak Trak towards the enemy, make sure the Engineer and Terror Drone are inside, attempt to capture the enemy MCV or War Factory)
Ore Refinery
War Factory
Sell MCV, if you managed to capture an enemy building, sell it for the funds
Attack with all your forces
Walking Engi: Any situation
Power Plant
Barracks (Scout the map), Send an Engineer walking around the outside of the map and attempt to capture an enemy building, if you do, sell it.
Ore Refinery
War Factory (1 Miner, Tanks)
Ore Refinery
Ore Refinery (Sell)
War Factory
All Air Rush: Allies against Soviets
Power Plant
Barracks (Scout the map)
Ore Refinery
Airforce Command Centre (build planes and Rocketeers)
Ore Refinery
Sell MCV
Harass him with your planes and Rocketeers and attempt to win
Double Drone Rush: Soviets against Soviet
Tesla Reactor
Barracks (Scout the map)
Ore Refinery
War Factory (2 Terror Drones, 1 War Miner, Tanks)
Ore Refinery
Attempt to "Drone" the enemy War Miners while they are on a Ore Refinery as they wont have the ability to shoot the Terror Drone
Ore Refinery (Sell)
War Factory
Attack now with your army
6-A list of the QM (QuickMatch) maps you will experience on Red alert 2
Each picture will be linked to the text directly beneath it.
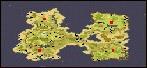
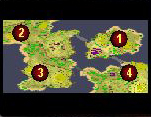
South Pacific (2-4):
- A symetrical map with a pinch (a tight space) in the middle, has 2 Tech Airports, one on each half of the map in the middle surrounded by lots of ore
- 4 Oil Derricks, 2 on the top and 2 on the bottom near your base with gems next to your MCV to begin with
- A scattered patch of gems in the very middle of the map can be used to broaden your army
- A good map with lots of money for air attacks, Tank splits and Navel Assaults
Isle Of War (2):
- A map with only one way to the opponents base, with a bridge (needs to be fixed) across the valley linking the two upper levels of the island
- A patch of gems near you mcv and a patch of of ore on that levelof the map, when you reach the upper level you will see two more patches of ore.
- Garrisonable buildings (some need repairing) for protection on the upper level of the island
- A navel map which can be used for navel wars and air fights, not many ways to attack via land so tank battles dont really happen
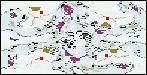
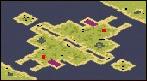
Heartland (2-4):
- An open map except for a river down the middle with a few bridges over it this map has 2 patches of ore near each starting position with 2 oil derricks, one at the top left of the map, the other at bottom right.
- Heartland has 2 Repair Bays situated near the Oil Derricks.
- This map is good for tank battles and the Repair Bays can be used for affective Hit 'n' Run assaults.
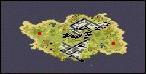
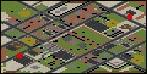
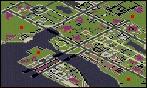
Urban Rush (2):
- A small map with a small city in the centre with a Tech Airport in the centre, this map has 2 patches of ore by your mcv and 2 more, above and below the Tech Airport.
- Garrisonable buildings in the middle to protect the Airport and to build off of
- This map is meant for quick and fast games relying on speed.
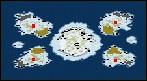
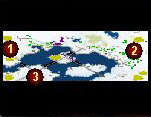
Depth Charge (2-4):
- A navel map made of 7 islands, 4 standard base sized bases with a patch of Gems and a patch of Ore on each, with a small island in between the 2 base islands, this tiny island has a single Oil Derrick on it, same on the other side of the map
- The remaining island holds 6 Oil Derricks can be found in the middle of the map
- A navel map good for navel battles and Air attacks
Pinch Point (2):
- A very long map with 2 patches of Ore next to the start position on the Right side only, the Left side only has 1
- The odd hut can be found in the valley between the 2 cliffs
- The cliffs hold a patch of Gems and a patch or Ore (The top cliff has 2 patches of Ore)
- This map is good for tank fights
Lake Blitzen (2-4):
- A map with large lake cut in two by a bridge with a Repair Bay on one side and a Tech Hospital on the other
- 2 Oil Derricks on land, in the middle on the outside of the map, on both sides.
- 3 Islands can be found in the water (2 on the larger water mass and 1 on the smaller), the island in the smaller water mass holds two Oil Derricks, one of the other islans has 2 Oil Derricks also and the other one has a Tech Airport on it
- A patch of ore near each start position with 2 patches of Gems which cane be found at the bottom in the middle and the other patch on the top of the map in the middle
- A map good for navel battles and air assaults
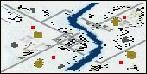
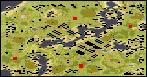
Montana DMZ (2-4):
- Divided down the centre by a river with only 3 bridges to get to the other side, this map has one Tech Airport situated to the right of the river near the top.
- A small patch of gems either above or just below your mcv (depending what position you are) with ore on the opposite side to the gems, and on each side of the map ou have a large quantity of gems in the centre
- With quite a lot of garrisonable buildings in the centre of the map and a few more scattered about this map is good for sneak attacks and lots of strategies.
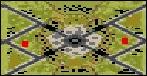
Snow Valley (2-4):
- With 2 height levels with the four start positions on the highest you start off with a patch of gems and a patch of ore by your base
- Once expanded to the bottom levels you will find ore scattered about in quite large amounts
- A hill in the middle which is the same height as your Base hill with 2 small patches of gems on it, this hill can be used as an advantage in tank fights
- With 2 identical cliffs stretching from the middle to the outside of the map you will find a small patch of gems on each cliff by the outskirts of the map
- This map is good for Air attacks, sneak attacks and creativity with tank battles
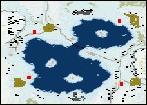
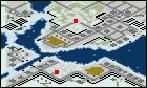
Cold War (2-3):
- Each start position starts close to a patch of Ore, 6 Oil Derricks on this map, 2 at the Top Left, 2 Bottom Right, the other can be found next to bridges in the centre of the map.
- Some Gems on the island in the middle with another patch of Ore, another patch of Gems can be found in the middle at the top
- A Tech Airport is near the Top Left corner below the Oil Derricks next to the Sea.
- More Ore can be found by the Oil Derricks at the Bottom Right of Cold War
- A map with Navel Capabilities and the potential to have Air Attacks and Tank fights.
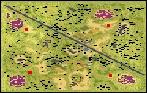
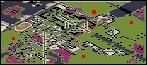
Golden State FWY (2-4):
- A completely open map with lots of money and 4 Oil Derricks, patches of gems can be found not too far from each Oil Derrick which are directly up or down (depending where your base is)
- Garrisonable buildings can be found in the centre of the map and patches of Ore are near your base
- A completely open map good for sneak attacks, Hit 'n' Run assaults and good tank fights.
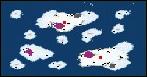
Alaskan Oil Spill (2):
- A map with 2 main islands, each with a patch of Ore and a patch of Gems, the top island has 6 smaller sized islands out in the water, each hold a single Oil Derrick.
- 3 more islands can be found down the bottom on the left, 2 are small and hold an Oil Derrick each, the other is slightly bigger and has enough space to build a base, this island has a patch of Ore on it
- A map purely for Navel Battles and Air Attacks.
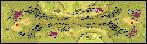
Hammer And Sickle (2-4):
- A map where you start off near 2 patches of Ore (1 patch can be up a cliff) and a patch of gems not too far away, on a different level to the one you are on
- With trees lining the valley you can hide Mirages here
- A navel map for Navel Battles, Tank Splits and Air Attacks
The Alamo (2):
- A map in the city with quite a few buildings on the left side near the Tech Airport which can be found almost in the Top Left corner with a patch of ore nearby
- 2 medium sized patches of gems in the centre of the map with a garrisonable building in the middle
- Excluding Top Left there is an Oil Derrick in each corner with a patch of ore next to each one
- A map good for tank splits and tactical methods
May Day (2):
- A map almost cut off by water with 16 Oil Derricks, 8 for each position and a Tech Airport to the East of your start position, and a Tech Hopsital aswell
- Garrisonable buildins can be found all around your base and some by the derricks on the Left side of the map.
- A map mainly for air attacks and navel battles
Paris Revisited (2-4):
- A map with lots of buildings on the left side with a few scattered about on the right
- 4 Oil Derricks, 1 near each start postions, gems can be found in the top centre and near the middle
- Lots of ore and building protection makes this map ideal for tank splits and large tank fights
DC Uprising (2-4):
- A Tech Airport in the centre of the map at the top, a Repair Bay near the middle and a Tech Hospital on the left side of the map down South
- Patches of Ore near each start position and Gems for top right and bottom left, lots of Gems and Ore in the middle of the map, with a fair few Garrisonable buildings nearby almost everywhere, good for covering your base
- This map is good for Air Attacks and Tank Splits.
Official Tournament Map B (2):
- Divided down the middle (diagonally) by a few small lakes this map holds 4 oil derricks, 2 on each half of the map (second Oil is only accessible by repairing the bridge. - If you're on th left side a large amount of gems are directly up from your position with a garrisonable hut in the middle which can be used to protect you miners. On the right side of the map the gems are below your start position, again, with the hut.
- Ore can be found just below (left side) or above (right side) but its best to go for the gems first. If needed late game there are 2 islands in the very corners of the map (top right corner and bottom left) with a small patch of gems on it.
- A map good for navel assaults or close base battles.
7-Extras
A fair chunk of this infomation was retrieved and altered from here:
http://xwis.net/forums/index.php?showforum=65
(mostly my work previously)
ATTENTION YOU GOOD PLAYERS OUT THERE
If you wouldnt mind linking anyone in need of help to this topic that would be great, thanks ^_^
Of course if ANYONE wants to ask for further help or just a genuine question feel free to Private Message me (depart3d) here on S-T or add my MSN, depart3d@hotmail.com
Some people like to sleep at night, me however...? I just type.

Edited by DonCarlo, 30 March 2009 - 02:10 PM.

