Credits to Fir3w0rx for this.
This is a guide to assist people with setting up their Hypercam for recording video replays of their games.
CLICK HERE to download Hypercam
Start X and Start Y are the coordinates of the TOP-LEFT corner of the rectangular region that you will be recording in, Width and Height are the dimensions of ths region.
(NOTE: The Width and Height settings in the above picture may differ to yours, depending on your screen size).
To record the FULL SCREEN:
Left-click "Select Region" > left-click the TOP-LEFT corner of your screen > left-click the BOTTOM-RIGHT corner of your screen.
(NOTE: For optimal performance, make sure that your Windows resolution is exactly the same as your game's resolution).
Hot Keys allow you to start/stop recording by pressing a combination of keys without having to alt+tab back to Hypercam and manually clicking "Start Rec.". It is recommended that you choose keys that are different to what you will be pressing in-game. For example, in RA2, Ctrl+1 assigns a group of units to the number 1 key on your keyboard. If you choose the same combination to start recording, you will also be assigning a new group to number 1.
"Pan the capture area..." - This allows you to move the rectangular area (which is being recorded) while recording. Ideal for recording while scrolling to different parts of the screen.
"AVI File Name" - This allows you to choose which directory to save all your recordings in.
NOTE: Do not forget to put a '\' (backslash) at the end of this line. For example: C:\Videos\
"Add sequential number to the file name" - Make sure to have this option selected, otherwise each new video will overwrite the previous.
"Rate in Frames per Second" - 10 is the default, which is good enough for viewing. You can increase this value if your PC can handle it. 25-30 FPS is what standard DVDs are set to, depending on which region you are using. "Record" and "Playback" should have the same value, otherwise your video will either be faster or slower than the actual speed of the game.
The "Video Compressor" plays a big part in the performance of your recording. XviD MPEG-4 Codec (as shown above) is highly recommended. If you do not have this option, download the "k-lite codec pack" (you can easily find this with Google) and install it.
"Frame compression quality" - 75% is ideal.
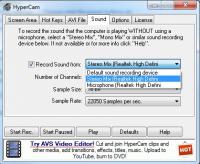
Sometimes selecting "Record Sound" does not always do so. If this is the case for you, and you are using Windows 7, CLICK HERE for a guide on how to record in-game sounds without the use of a microphone.
"Record Cursor" - allows you to record the Windows cursor. This is often confused with the game's cursor. Selecting this option will record both your Windows cursor and your game's cursor. Only use this option if you are recording your desktop.
The rest of the settings were not explained as they were either self-explanatory or unnecessary. Hopefully this guide has been helpful to you and in turn allow you to create some interesting and entertaining videos for us all! 
Edited by hardman, 22 February 2015 - 08:22 PM.